Sidebar
en:studentexchange:settings:ui
This is an old revision of the document!
Table of Contents
User interface introduction
Overview
The following diagram illustrates the main elements of the SchoolDrive interface:
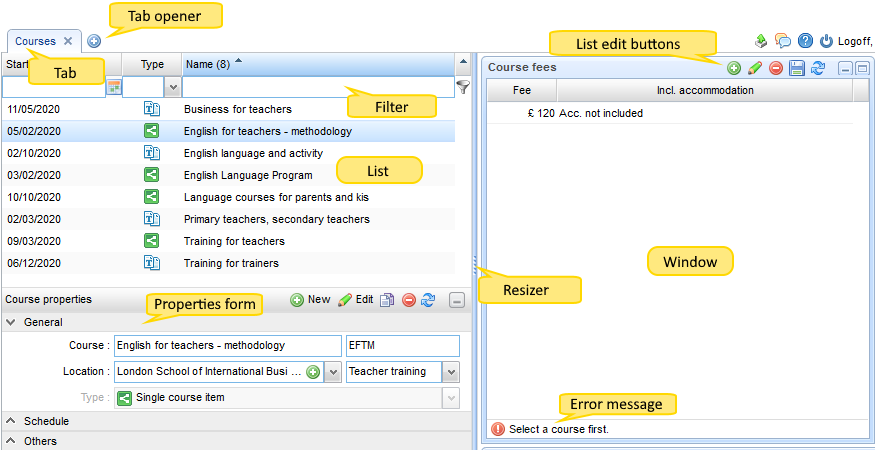
On the left are the tabs: Courses and Settings.
Tabs can be reordered using drag-drop, closed or reopened with the plus button next to the tabs. Clicking on the tab will display the information on the tab. Depending on the content, there may be sub-pages to the right that further break down the content.
The content is arranged from left to right: often there is a list on the left with a properties section below the list. Information related to the data on the left is displayed in the windows on the right.
Lists
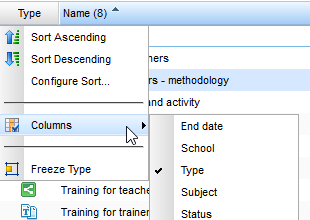
In the list header, clicking on the  button opens the menu where new columns can be displayed, the list can be soted or grouped:
Clicking on the  icon on the left of a list row (if available) displaysd detailed information related to the list row.
Lists can be edited using the editing buttons 


 that are either located in the window header or in the toolbar under the list. A new row can be added by clicking on . An existing row can be edited by clicking on or removed using the button. Changes to a row can be saved with or by clicking somewhere next to the edited row. button is used to reload the list.
Error messages
Errors are indicated by a red exclamation mark. Moving the mouse over the icon display the error message.
Help and forum
Clicking on the  button in the upper right corner will take you to the wiki.schooldrive.net web page. Clicking on
  opens the forum (at https://forum.schooldrive.net).
en/studentexchange/settings/ui.1571839660.txt.gz · Last modified: 2019/10/23 16:07 by balazs